Secure access to PostgreSQL on Raspberry Pi
First time this month I thought about doing something right. It’s the end of the year and what about creation of really secured environment for my PostgreSQL database on a Raspberry Pi, that I could expose publicly. What could go wrong here :) ?
The goals were clear:
- Setup a dedicated low-privileged system user, so I could proxy to the database over SSH.
- Create a new low-privileged PostgreSQL user, so it can access own database only (or ones created in the future).
- Move the existing databases data files to an attached SSD drive (instead of using microSD card, the OS is installed on).
- Configure my both beloved tools: pgAdmin4 and DataGrip to access the data sources respectively.
True. Expect a lot of troubles.
Dedicated system user
That appeared to be simple. Create new user, answering few questions about full name and password. Additional line of security is to setup invalid shell, thus this user can’t login interactively onto this Raspberry Pi machine (can only use it as encrypted proxy to internal service!).
sudo adduser remote_user --shell /bin/false
If you want to login (to check, what failed at some point), shell /bin/bash could be used instead. Simply find the user entry inside /etc/passwd file and update the path setting.
So far, so good. We could make this part a bit more complex, by creating a dedicated group for users that play with the database remotely. But this can be skipped without any further impact on the whole configuration.
sudo addgroup "database_users"
Then the adduser command would need to have another switch --ingroup database_users.
Adding PostgreSQL user
This step also could be handled by few simple commands. Switch to postgres user (created automatically during installation process of the database engine) and then create new database-server credentials/account. If you don’t have PostgreSQL installed, a very good guide could be found here.
sudo su postgres
createuser service -P --interactive
Almost done. As at this point it turns out that… I did recently upgraded OS on the Raspberry (described here) and it actually caused something extraordinary. It completed with two instances of PostgreSQL installed in parallel - v9.6 and v11.5, while only the older one was running. The new one was just sitting there and waiting. If you are interested, how to migrate from v9.6 to v11.5 and get rid of unused installation - please visit this post.
To make sure, which version of the engine is running:
sudo su postgres
psql -c "show server_version;"
Should display result as:
         server_version
--------------------------------
 11.5 (Raspbian 11.5-1+deb10u1)
(1 row)
Moving PostgreSQL data directory to SSD
Helpfully, there are 2 additional guides I could recommend. First guide will let you through the process of identifying the USB drive and correctly putting respective UUIDs into fstab file. I would also like to mention to add exec rights there as I described here. It solved my other issue with lack of updated stats on Gitea running locally on the Raspberry Pi and it will serve here as well. The second guide is all about moving the data. It refers to Ubuntu, but is still relevant to Raspbian.
So let’s assume, that mounted SSD drive landed as /volumes/gonzo. Then:
- Stop currently running PostgreSQL service.
sudo service postgresql stop
- Copy all data files (along with access rights etc.).
sudo rsync -av /var/lib/postgresql /volumes/gonzo/
- Create an easy to remember symlink to the data directory. It might be especially valid in the future, when you would like to move it to yet another drive.
ln -s /volumes/gonzo/postgresql /volumes/postgresql
- Update the configuration
/etc/postgresql/11/main/postgresql.confto expect data in new directory.
data_directory = '/volumes/postgresql/11/main'
# old location: '/var/lib/postgresql/11/main'
- Start PostgreSQL service.
sudo service postgresql start
Configuring pgAdmin4
What we do have now are:
- name/IP address of the Raspberry Pi
- new Raspbery Pi’s user -
remote_userwith a password - new PostgreSQL user -
servicewith another password
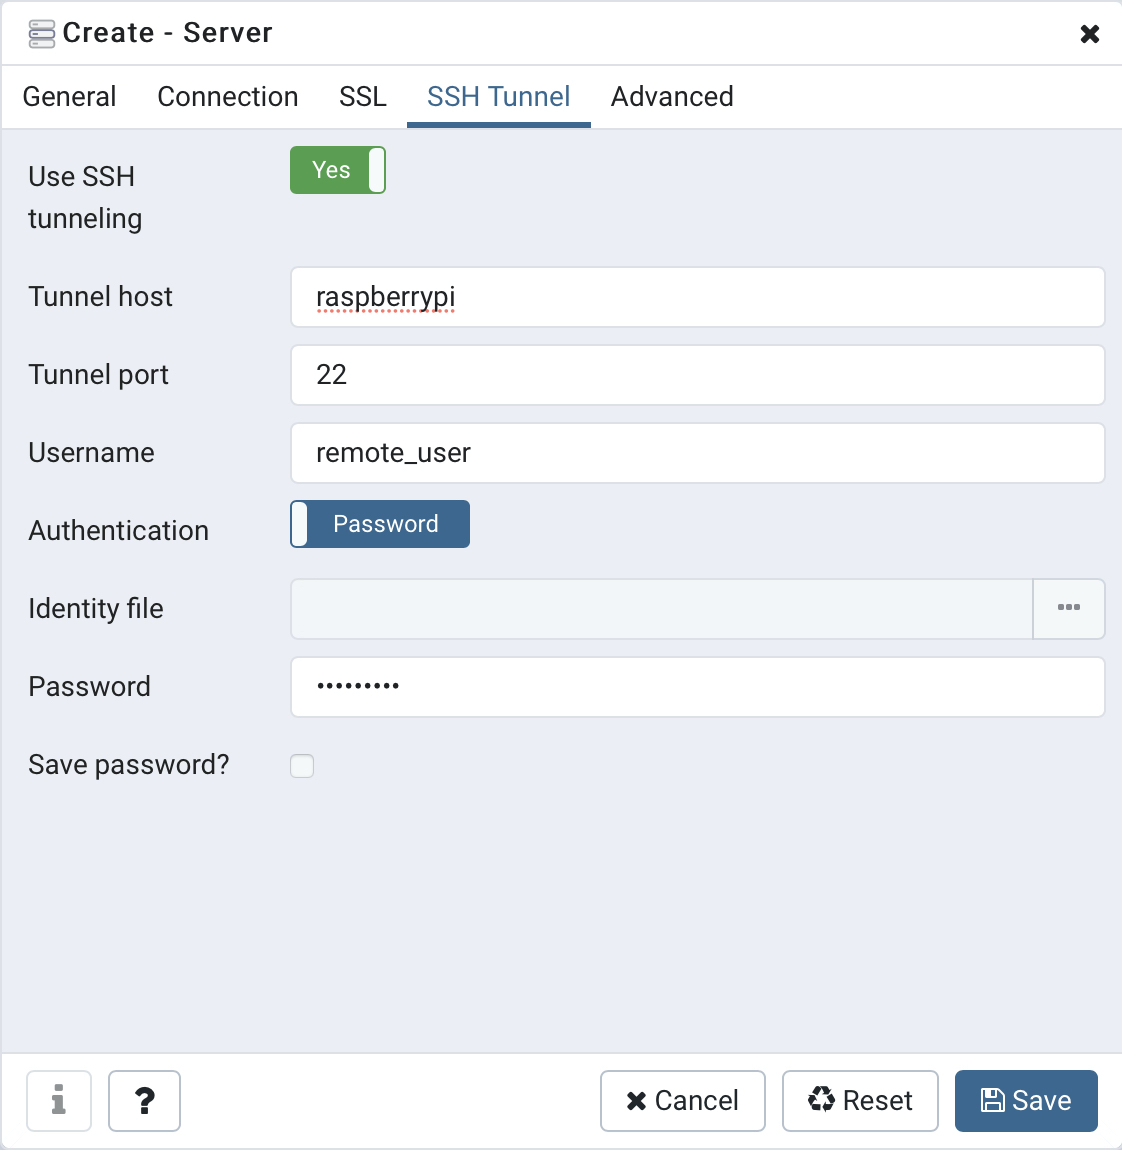
Now it’s time to set this information in. Open your pgAdmin4 website. Then right click on Servers > Create > Server… (yes! the naming is very bad here). Then you should see a dialog to define a new connection. Fill the Connection and SSH Tunnel tabs similarly to presented below, but inserting own addresses that match your environment.
And define first the SSH proxy to route the traffic.
Then come back to Connection tab to define properly PostgreSQL user and password.
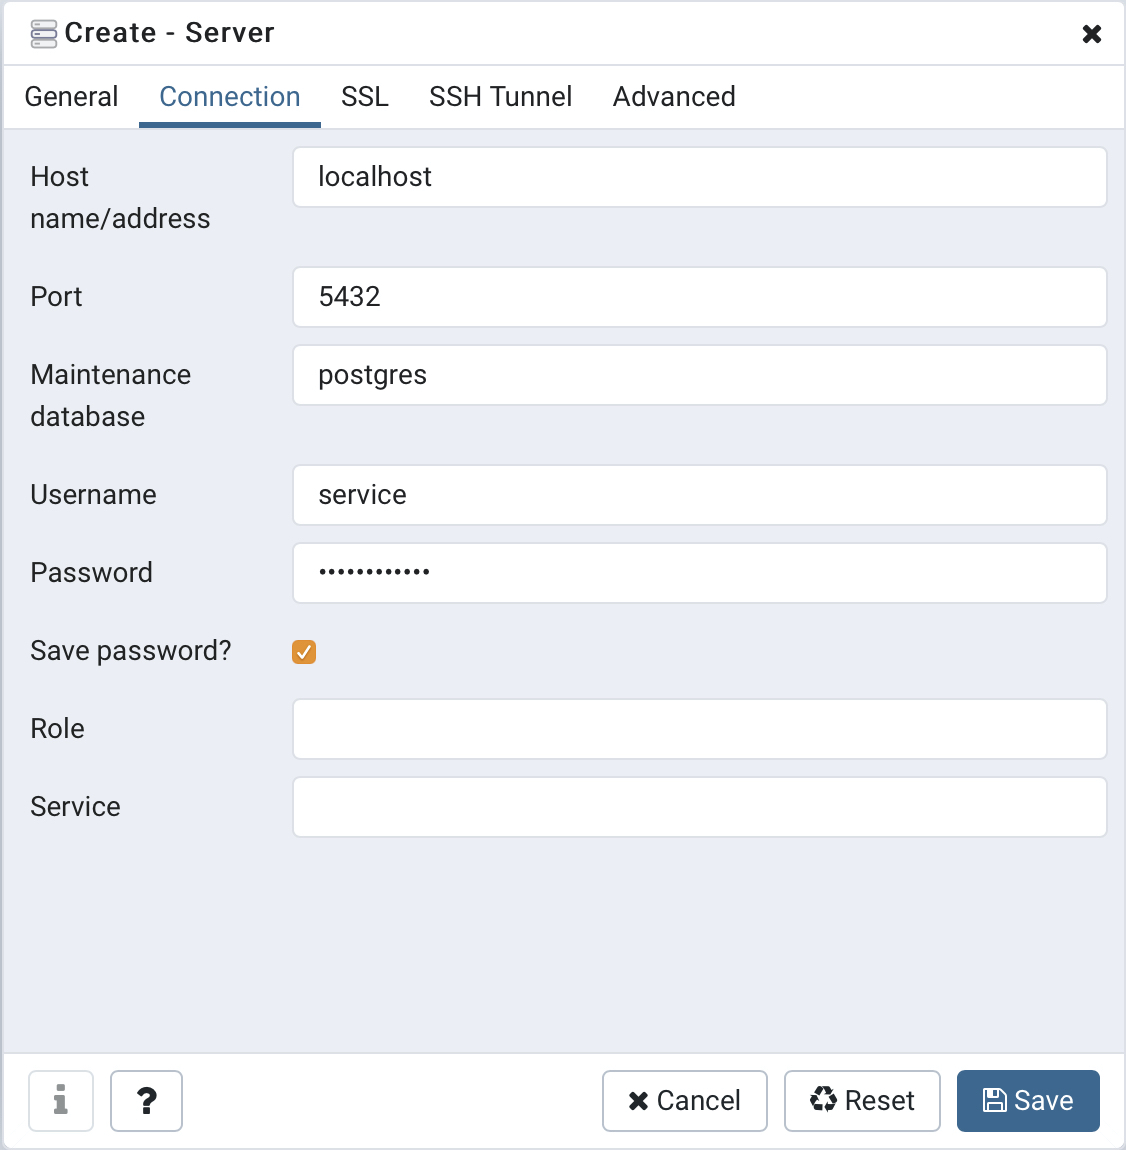
It’s essential here to leave the localhost as the server. Please remember that SSH already caused the authentication on the Raspberry Pi itself.
Once saved, all should start to work and you should be able to add new schemes, tables and insert data into it.
Configuring DataGrip
Here, we have the same input data as stated along with pgAdmin4 above - address, users and passwords. And here is the recipe, where to put them to make the tool operate.
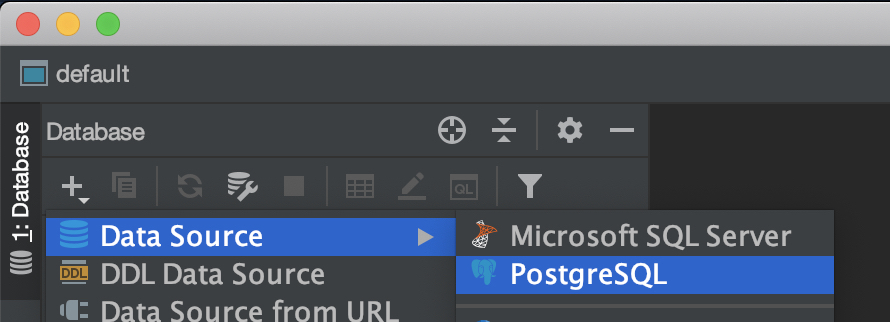
Open DataGrip and add on the Database panel select new Data Source > PostgreSQL via the toolbar. It might be somewhere lower than the top 2 items as shown below, but it’s definitely there.
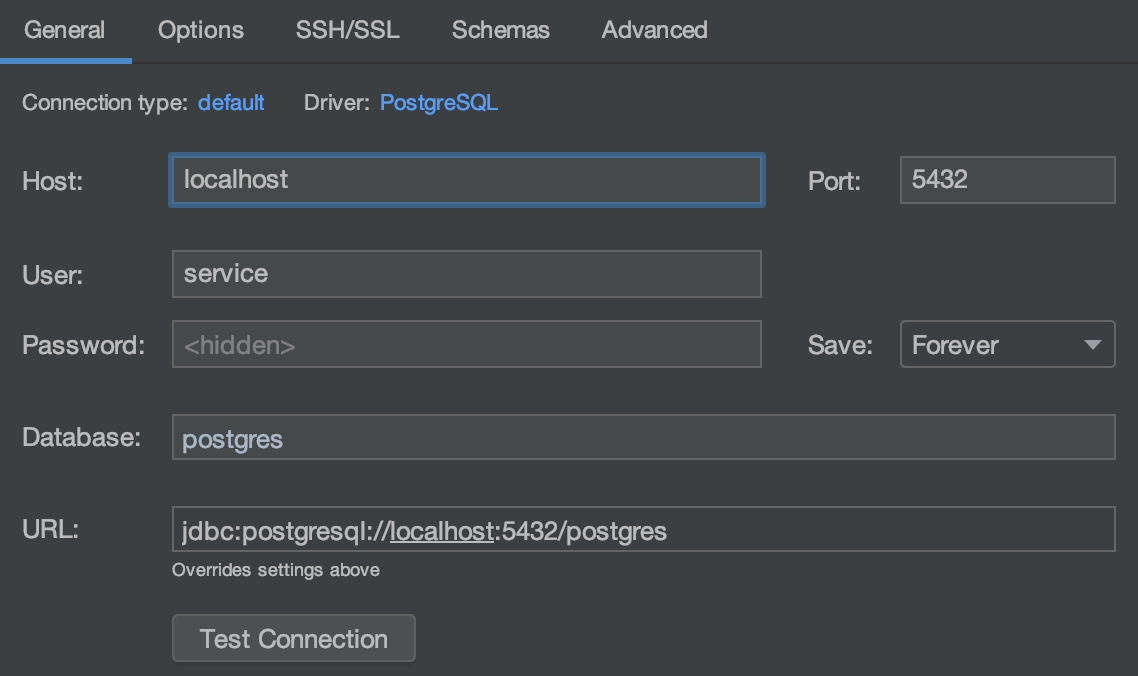
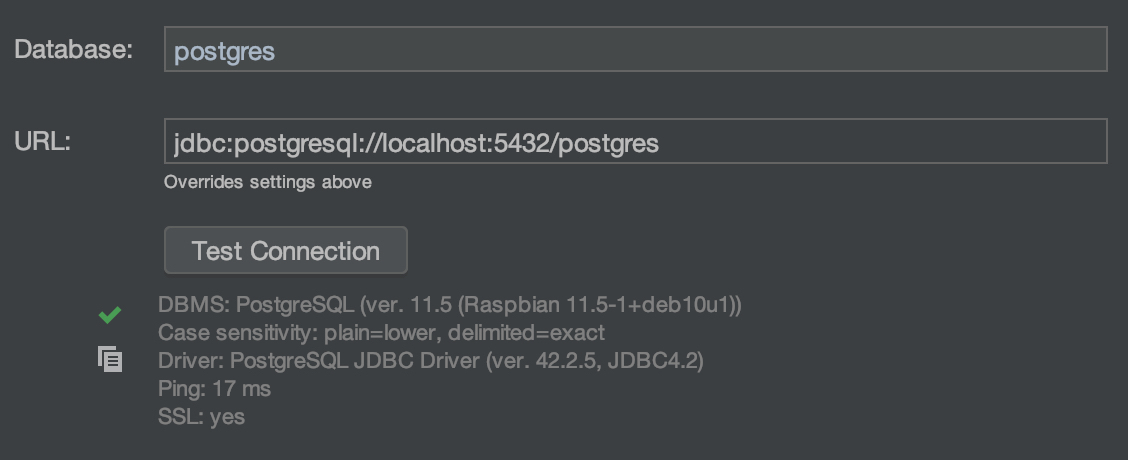
Then fill respectively configuration in SSH/SSL and General sections. Once again - the server name is localhost as the tunnelling makes it running on the destination Raspberry Pi already. Device address should be used only, when setting up proxy tunnel.

Hint!
Unfortunately, it wasn’t working on my machine. Testing connection was showing some handshake critical problems. No matter what I changed here or on the Raspberry or PostgreSQL site, it was still failing to connect.
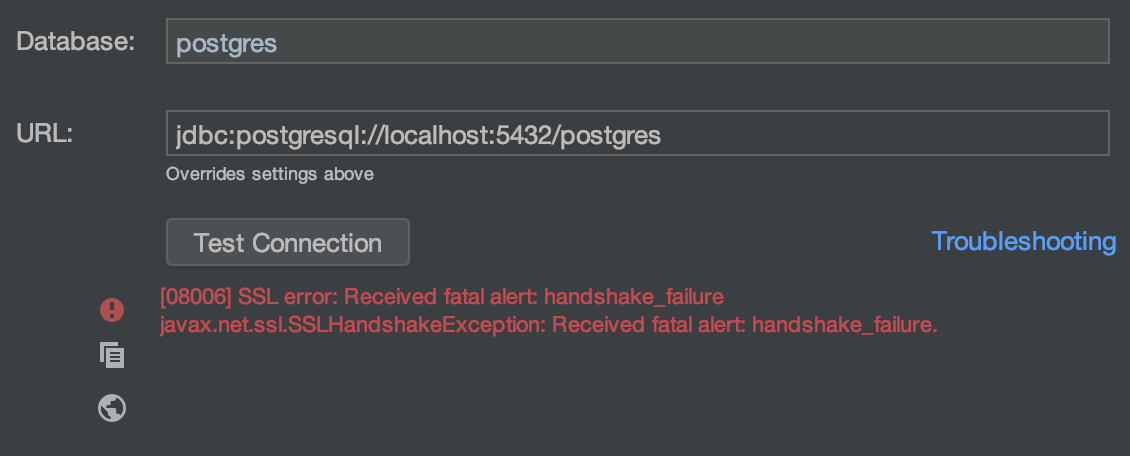
At the end of the day, I became so frustrated that I renamed the DataGrip among the Applications and installed a fresh one again. Don’t know, if the previous updates or anything else had an influence and corrupted something related to network authentication, but apparently this operation helped. After reinstallation the same exactly (as already existing) connection works like a charm and connects with milliseconds.
Funny fact is, that I also had identical problem on my Windows machine and the same fix applied, solved the issue there, too.
Now, we are done!