HowTo: Using assets in Android unit-test project
You have probably heard already a tremendous number of times that unit-testing your Android code is important. It’s all true and still valid. And there is one recipe I tend to forget quite often, which I also found extremely useful, while writing tests exercising (or relying onto) any external data.
In this scenario, all the content is kept outside of the unit-test itself and is simply read at runtime from resources (aka assets). It gives much better clarity as usually as moving it away of Java/Kotlin source code also avoids adding lots of escaping characters. Then once this content is loaded, it can be validated using AAA Fundamentals ➡️ some model could be deserialized from text representation and used to execute predefined action. In some pseudo-Java code it could look like following:
public final class ModelTests {

    @Test
    public void test_verify_correct_model_deserialization() {

        // Arrange

        final String data123 = ""; // somehow load the data from "data123.json" file
        assertNotNull(data123);

        // deserialize from JSON to construct an object-model structure
        final Data123Model model = new GsonBuilder().create().fromJson(data123, Data123Model.class);
        assertNotNull(model);

        // Action

        // Assert
    }
}
Now, depending on how to run this test, there are two distinct approaches:
on simulator / real device - that means we can use any Android API to load the file. It all will be handled as Android Instrumented Test in Android Studio. This will also have a tendency to fail, when there is no simulator available.
on the build machine itself - that means test will be executed with full-native speed using JUnit and without any other additional dependencies or abstraction layers.
So far, so good. Let’s see, how to achieve it in both configurations.
Setup
Before we move to the actual tests, let’s try to add some resources into the project. It’s common for both presented further ways of running the test. Please be patient, this shouldn’t take long.
Add
assetsfolder into the library project.Right click on the project node then
New > Folder > Assets Folder.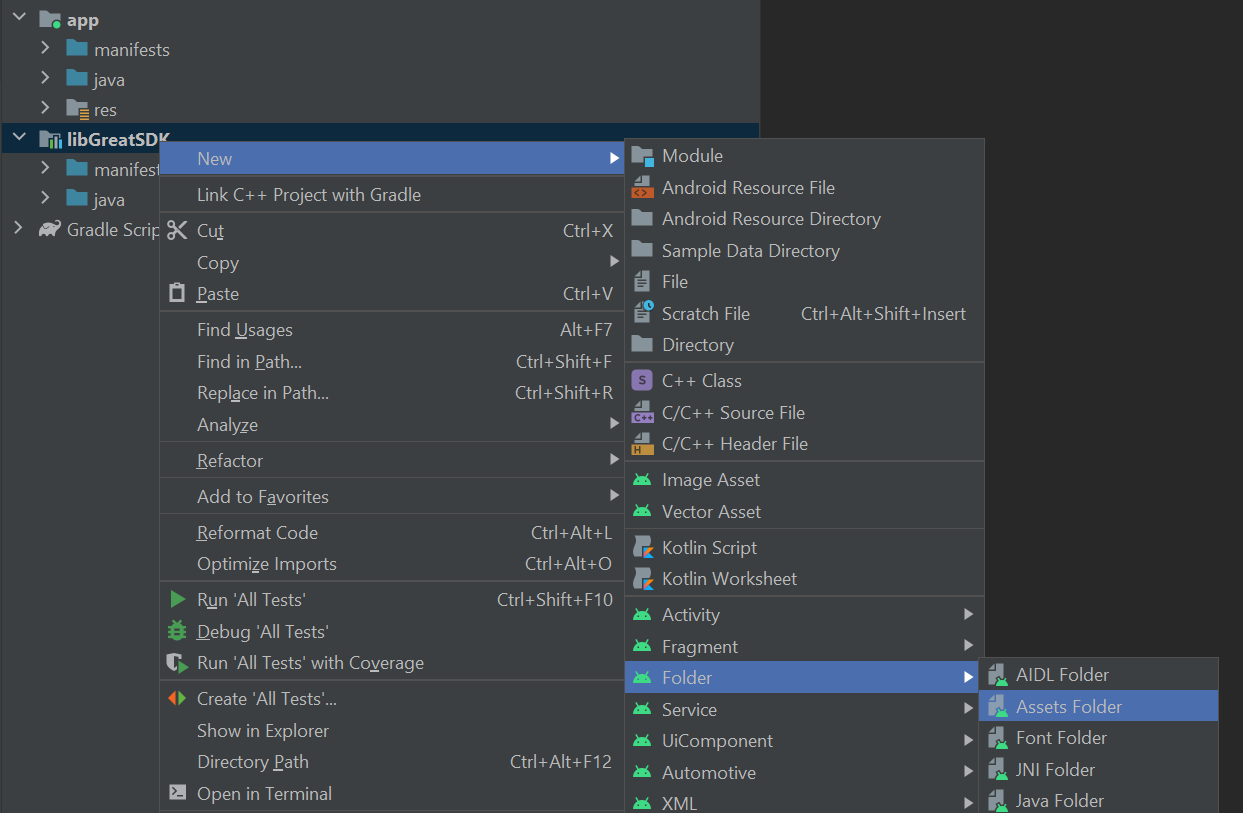
Remember however to use
testcustom location, so those files are only visible when running unit-tests.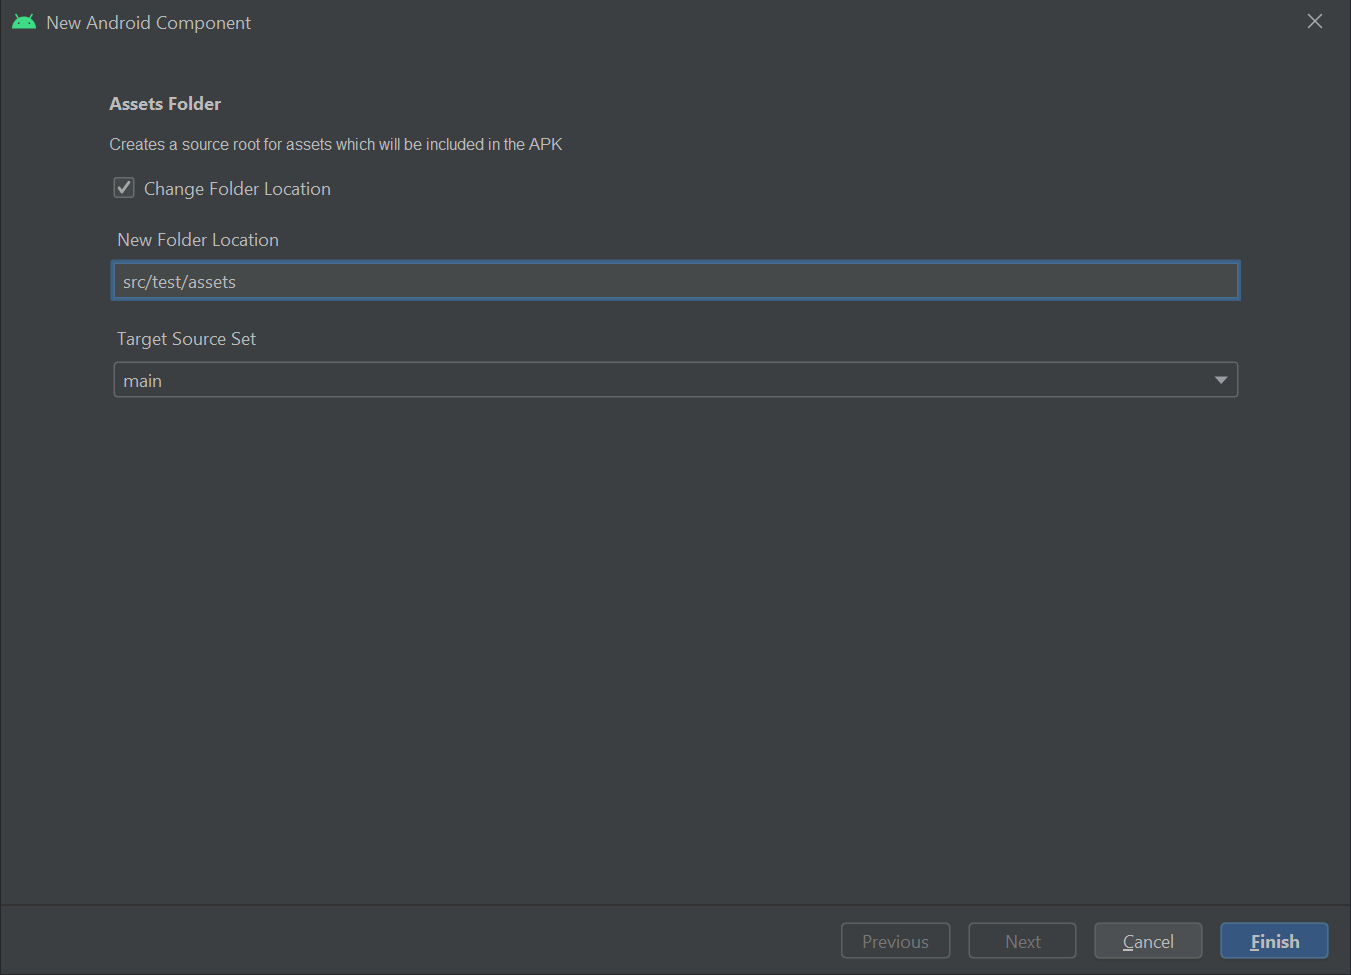
The library’s
build.gradlefile should point to the assets folder, yet it should be different for both flavors (mainandtest).android { // ... other definitions remove for clarity ... sourceSets { main { assets { srcDirs 'src\\main\\assets' } } test { resources { srcDirs 'src\\test\\assets' } } } }Now add a
data123.jsonfile into the project.Make a double check, that it is physically located under
src\test\assetsdirectory, so it’s not included in the application release bundle and used only during tests.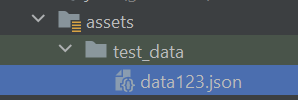
It’s content could be as simple as following:
{
    "data": 123
}
Android Instrumented Test
Finally, write a test using it.
Remember you need a configured and running AVD at this stage to see any progress and be able to set breakpoint.
import android.content.Context;

import androidx.test.platform.app.InstrumentationRegistry;
import androidx.test.ext.junit.runners.AndroidJUnit4;

import org.junit.Test;
import org.junit.runner.RunWith;

import static org.junit.Assert.assertNotNull;

@RunWith(AndroidJUnit4.class)
public final class ModelTests {
    @Test
    public void test_verify_correct_model_deserialization() {

        // Arrange
        final Context appContext = InstrumentationRegistry.getInstrumentation().getTargetContext();
        final String data123 = ResourceHelper.loadString(appContext, "test_data/data123.json");

        assertNotNull(data123);

        // Action ...

        // Assert ...
    }
}
Results at runtime will probably be similar to:

The missing piece is of course the ResourceHelper class, that is responsible for reading the file and returning it as String instance. In its most basic form it would look like following.
Notice that it simply returns null value in case of any errors. It exposes 2 methods. One that converts data from an input stream as UTF-8-encoded string. Second one actually gets the AssetsManager instance out of the current application context and opens a stream for given embedded resource. Name parameter carries of course the relative path of the resource to load from assets folder.
import android.content.Context;
import android.content.res.AssetManager;

import androidx.annotation.NonNull;
import androidx.annotation.Nullable;

import java.io.ByteArrayOutputStream;
import java.io.IOException;
import java.io.InputStream;

public final class ResourceHelper {

    @Nullable
    public static String loadString(@NonNull Context context, @NonNull String name) {
        final AssetManager assets = context.getAssets();

        if (assets == null) {
            return null;
        }

        try {
            try (final InputStream input = assets.open(name)) {
                return loadString(input);
            }
        } catch (IOException e) {
            return null;
        }
    }

    @Nullable
    public static String loadString(@Nullable InputStream inputStream) {
        if (inputStream == null) {
            return null;
        }

        try {
            try (final ByteArrayOutputStream result = new ByteArrayOutputStream()) {
                byte[] buffer = new byte[4096];
                int length;

                while ((length = inputStream.read(buffer)) > 0) {
                    result.write(buffer, 0, length);
                }
                return result.toString("UTF-8");
            }
        } catch (IOException e) {
            return null;
        }
    }
}
Local Test
Running it locally is even simpler. The same testing assets are reused, but since we don’t run any Android app anymore, there is no need to use the application Context to access them.
Hint: Android Instrumented Test file and Local Test file must be different otherwise Android Studio will have problem understanding, which one we want to run and how.
import androidx.annotation.Nullable;
import org.junit.Test;

import static org.junit.Assert.assertNotNull;

public final class RawModelTests {
    @Test
    public void test_verify_correct_model_deserialization() {
        @Nullable
        final String data123 = ResourceHelper.loadString("test_data/data123.json");
        assertNotNull(data123);

        // rest of the test...
    }
}
Results at runtime will probably be similar to:

import androidx.annotation.NonNull;
import androidx.annotation.Nullable;

import java.io.ByteArrayOutputStream;
import java.io.IOException;
import java.io.InputStream;

public final class ResourceHelper {

    @Nullable
    public static String loadString(@NonNull String name) {
        return loadString(ResourceHelper.class.getClassLoader(), name);
    }

    @Nullable
    public static String loadString(@Nullable ClassLoader loader, @NonNull String name) {
        if (loader == null) {
            return null;
        }

        try {
            try (final InputStream inputStream = loader.getResourceAsStream(name)) {
                return loadString(inputStream);
            }
        } catch (IOException | NullPointerException e) {
            return null;
        }
    }

    @Nullable
    public static String loadString(@Nullable InputStream inputStream) {
        if (inputStream == null) {
            return null;
        }

        try {
            try (final ByteArrayOutputStream result = new ByteArrayOutputStream()) {
                byte[] buffer = new byte[4096];
                int length;

                while ((length = inputStream.read(buffer)) > 0) {
                    result.write(buffer, 0, length);
                }
                return result.toString("UTF-8");
            }
        } catch (IOException e) {
            return null;
        }
    }
}
The name of the resource is again relative within the assets folder. Notice also that this time the function loading content from input stream is identical to the one from Android Instrumented Test version. The biggest difference here is only on how the input stream is obtained. Instead of using assets-manager, the library-specific class loader is used, which is capable of opening streams for specified embedded resources.
Summary
Of course I am not the only one, who knows how to read resources for testing. There are some other very good guides and explanations here, here or project here.
I really believe it helps you too. Cheers!